Lightning and iPhone Photography!
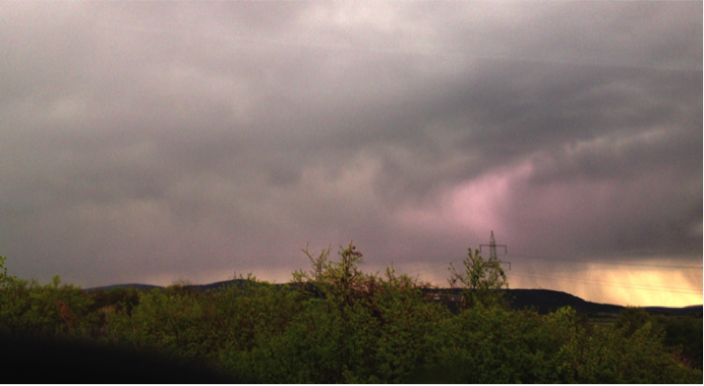
Most lightning occur between, within, or above the clouds. When lightning occurs within the cloud or above, it will light up the whole cloud, but you will not see the flash line (= sheet lightning), regardless of exposure.
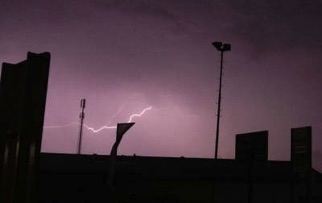
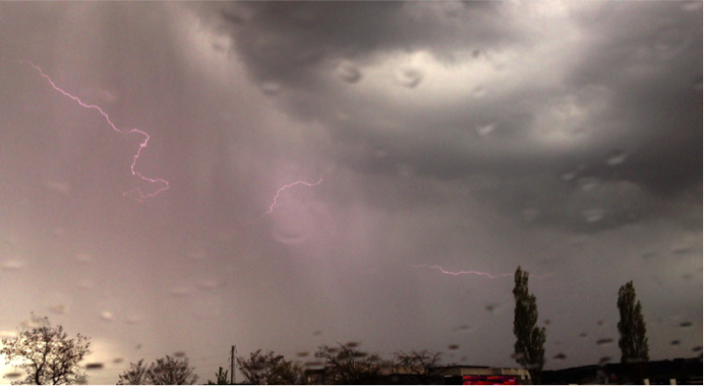
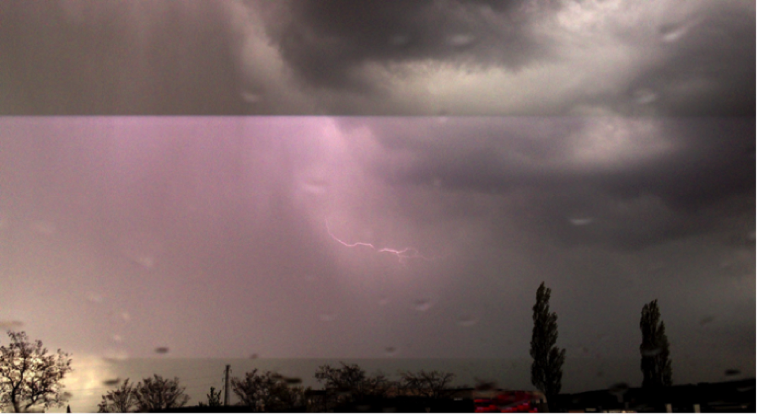
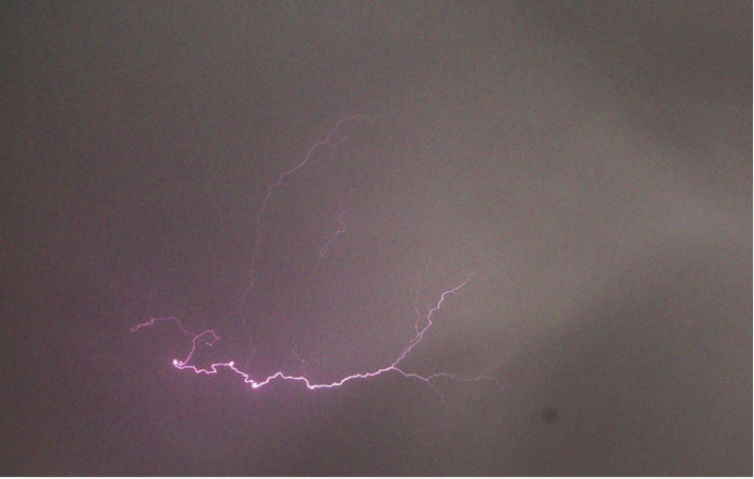
The aim is a photo of a lightning bolt between two clouds or from cloud-to-ground.
At night, the default camera app of the iPhone uses a high ISO number (= high sensitivity). Therefore, with the standard camera app, lightning will always look overexposed.
Overexposure with ISO 800:
Therefore, we need a low ISO number for lightning photography at night.
However, this parameter cannot be freely chosen on the iPhone.
Therefore, we need ISO - control. The assistant guides us to the perfect settings.
Perfect exposure control by ISO:
Lightning artifacts:
During day, the exposure time is always shorter than 1/20 s. Due to the camera type (rolling shutter technology of the iPhone) 20-30% of the images will show rolling shutter artefacts.
Rolling shutter artifact:
In broad daylight (Only if the storm is very close), you can optionally hold clean sunglasses front of the camera, resulting in the longer exposure times. The percentage of artifacts will be reduced.
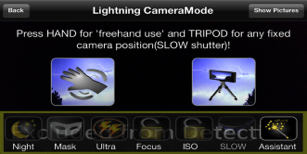
At night, SLOW mode can reduce the chance for image artifacts! Slow mode needs fixed camera position. We therefore recommend a tripod or some other fixed position of the camera. (Eg, car mount with suction cup in the car or on window). Without a tripod, the images will appear blurred in SLOW mode! (“SLOW mode” is obsolete since iOS 8.0, iLightningcam will activate slow anyway, if possible. There is no “SLOW” button anymore)
Slow Mode inactive: Slow mode active:
The SLOW mode works only for NIGHT!
(“SLOW mode” is obsolete since iOS 8.0, iLightningcam will activate slow anyway, if possible. There is no “SLOW” button anymore)
Assistant:
If your iOS is newer than iOS 8.0 the assistant enables the SLOW mode automatically at night, if you
the tripod icon is selected.
The assistant uses the normal ‘night mode’ at night if you select
the freehand icon.
Instructions - Details:
There are two ways to capture lightning pictures:
HD video mode (3-4 images per lightning possible at HD video resolution)
iLightningCam analyzes with up to 30 FPS during the day and up to 24 FPS at night (FPS = frames per second) the HD video stream (720p resolution for iPhone 4, iPhone 4S 1080p and 5).
Upon detection of a lightning iLightningcam stores the video image in which the lightning occurs. This image is stored with JPEG compression. The picture is not coming from the compressed video stream. It directly comes from the camera. Therefore, it offers very high quality. Video Still mode is obsolete since iOS 8.0, Photo mode is always the best option.
Photo Mode (Photo Resolution)
iLightningCam stores the flash with the main camera with full photo resolution (5MP for iPhone 4, 8MP for iPhone 4S and 5). Unbelievable but true: iLightningcam has no measurable shutter lag in both modes. Since Version 6.0 this mode is as fast as the ,HD video mode'.
iPad 2 and iPod touch:
For these devices, there is only the 'Video Mode' available because the HD video resolution and photo resolution of these devices are the identical (each pixel). Video Still mode is obsolete since iOS 8.0 for these devices, Photo mode is now the best and only option.
Here are the Details for the Control Buttons:
Video Still mode: Video Still mode is obsolete since iOS 8.0, Photo mode is always the best option.
-Tap on a blank area of the screen to focus or refocus (the continuous autofocus is always disabled).
-Images saved: Number of images in which lightning was detected.
FPS: The number of frames that are analyzed per second depending on the exposure parameters (range: 8 FPS in SLOW mode during night up to 30 FPS during the bright daylight).
- Press "Show images" to go to the gallery.
-Gallery:
Select the desired images by touch. Then press "Save images".
The selected images are then stored in the images directory of the iPhone.
Unselected images are lost after you press the "Back" button!
Photo mode:
-Tap on a blank area of the screen to focus or refocus (the continuous autofocus is always disabled).
-Images saved: Number of images in which lightning was detected. These images are directly stored into images directory of your iPhone.
FPS: The number of frames that are analyzed per second depending on the exposure parameters (range: 8 FPS in SLOW mode during night up to 30 FPS during the bright daylight).
Photo and HD video mode:
Exclude lower 4th from detection:
Cars and flashing lights in the city might lead to incorrect triggering of the camera.
Select 'Exclude 4th from lower detection ' to exclude this source of disturbance in the assistant or in the options menu.
This feature excludes the lower quarter of the screen of the lightning detection.
The height of the exclusion area can be adjusted at any time with your
finger.
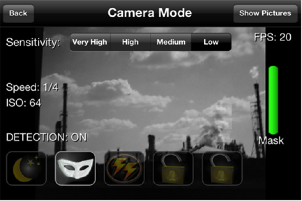
Advanced Mode:
Select the "Advanced Mode" in the options menu if you want to use all display and control parameters.
-Show Mask
Since version 5.0, the ‘auto’ setting automatically controls mask and sensitivity.
The following area is for experts only.
, Show Mask 'is only useful if the sensitivity not is not set to 'AUTO’.
Press for the mask view.
All masked areas are shaded in white and are excluded from the lightning detection.
The purpose of the mask is the reduction of incorrect triggering.
If the horizon or the clouds have a high contrast, these structures are masked. All strikes in this area will be ignored.
The mask is directly dependent on the chosen sensitivity.
High sensitivity means a high success rate for lightning detection.
During the day however, sometimes you have to choose a low sensitivity, otherwise a large part of the image will be excluded from detection.
If too much of the sky is masked, reduce the sensitivity until your target region is not masked anymore!
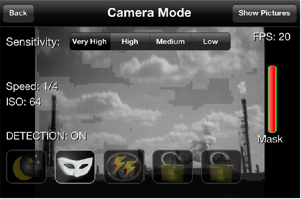
Example:
Show-Mask mode with ,Very high' setting (Red arrow). It is too high for this scene. Almost the entire image is shaded white and therefore excluded from detection. The mask bar (blue arrow) is completely red! Switch to a lower sensitivity!
"Show Mask" mode with 'High' setting (Red arrow) setting. But the sensitivity is still too high for this scene. Large parts of the scene are shaded white and therefore excluded from detection. The mask bar (blue arrow) is not green enough! Switch to a lower sensitivity!
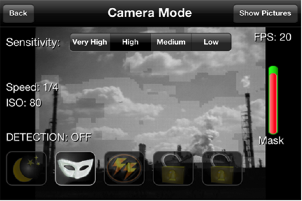
Show Mask mode with 'Low' setting. Well suited for this scene. Only small parts of the scene are excluded from recognition. The mask bar is now green!
Deactivate 'Mask', when you're done. The display of the mask information costs computing time, the detection of lightning is worse during the mask display.
The 'Mask Mode’ uses a greyscale display.
- Press "ISO" to lock the ISO control the app.
If the lock is active, the lock icon appears locked.
The lock is useful if you want to prevent fluctuations in brightness in the exposure during day.
- Press "Focus" to lock the focus of the camera.
If the lock is active, the lock icon appears locked.
This lock is useful if you want to prevent that the focus is unintentionally shifted.
Warnings:
Thunderstorms are obviously dangerous and life threatening for you and your phone. Take care using this software! Do not take any risks and avoid exposure to thunderstorms! Use this App only in lightning and storm protected places. You are solely responsible for your actions and adverse consequences. Read full safety warning in the instructions page, before using this software.
- Seek shelter during Thunderstorms.
- Do not use this software during hurricane or extreme weather conditions and seek shelter.
- Never actively seek a thunderstorm, as this is a life threatening weather condition.
- Do not take any risks during using this app; you are solely responsible for any injuries or death.
- Do not allow children or impaired persons to use this software during thunderstorms.
- Only use this software in lightning and storm protected places, remember there is no safe distance to a thunderstorm, lightning can occur even at the edge.
- Don't charge your iPhone during thunderstorms, voltage peaks might damage or destroy your device.
- Always stay away from conducting structures, e.g.: metal, trees, hills, power lines or any other high structures and water.
- If there is no option to flee or to seek shelter drop to your knees and bend forward with your hands on your head. Do not lie flat on the ground.
- Never use iLightningCam when driving.
iLightningcam original shots with an iPhone 4s:
Three simultaneous lightning bolts, early twilight, video mode, Ultra on.
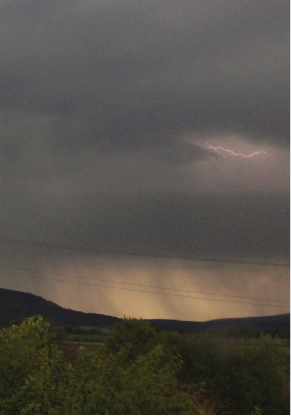
Early twilight, Video mode, Ultra on, only a lightning, no flash line.
Early dawn, Video Mode, Ultra on, the lightning at the left side is overexposed, the line not is visible. For this bright lightning, the night mode with lower ISO would have been better.
But for this little lightning, the exposure was perfect.
Very short bursts, that are shorter than the exposure time of the image sometimes result in brightness / light band artifacts (rolling shutter artifacts).
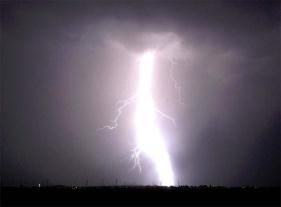
Perfect shot
Have fun! Always seek shelter! Protect yourself before the storm, the rain and lightning!
Night Mode:
Why, Night Mode '?
iLightningcam without ISO control
ISO 800, iLightningcam 3.8 - Overexposed, high image noise!
Night mode with ISO Control:
ISO 250, iLightningcam 3.8, same place, same thunderstorm, different lightning bolt and perfect exposure using Night-Mode! Low image noise!
As a side effect of low ISO values is less image noise.
Therefore, some images have almost digital SLR quality!
Digital SLR owners, however, are not fast enough to catch the lightning .
iLightningcam 03.06 at night, iPhone 4s, night mode, ISO 250
When shall I use ‘night mode’?
During the night, in the late evening and early morning!
BEFORE you activate ‘Night Mode’:
Select ‘Advanced mode’ in the options menu for more control!
Focus on a distant object or a light source (at least 3 meters) by tapping the screen.
Then tap ‘Focus' to lock it.
Apple does not allow direct access to the exposure parameters before iOS 8.
Therefore, this mode is a workaround. Since iOS 8, we have direct access to the exposure parameters.
Objective: lower ISO values during night!
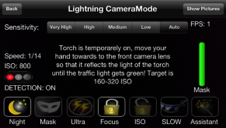
Choose 'Night':
Choose the appropriate lightning size.
If you have iOS 8 or newer skip to iOS 8 or later:
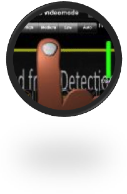
The LED torch is now temporarily on. Hold your hand in front of your iPhone (50cm or 20 inches), so that the hand reflects the light of the torch. Watch the traffic signal (red arrow) on the left side of the iPhone!
The light is red at the beginning. Wait a second, then move your hand slowly to the iPhone. The closer it comes to the iPhone, the more light is reflected by the hand.
In the 'Advanced Mode' you can directly observe the ISO settings. Once you are close enough, the camera will lock the ISO (ISO 80-100 for large lightning, ISO 160-200 for medium lightning and 200-320 for small lightning) and the traffic light turns green.
Then the LED torch automatically turns off, and you're ready for photography.
Since the iPad2 and iPad3 have no LED torch, point your device slowly to an external light source to adjust the ISO settings. Use the advanced mode to observe the changes of your ISO values.
iOS 8 or later:
This mode allows better recognition and better pictures.
If you point your iPhone back to the storm, the picture will look too dark, but the exposure is suited for lightning.
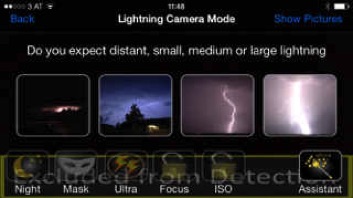
Thunderstorms and lightning differ in intensity.
Therefore, the assistant asks for the size of the bolts that you expect.
ISO control:
For small lightning choose the left Image.
For medium lightning select the middle Image.
For large lightning choose the right Image.
Example: The middle picture was chosen. ISO 250
The image is overexposed! The lightning bolt is too bright.
In such a case, please select the assistant again and select the brightest lightning bolt (right image).
The result: a perfect lightning exposure with ISO 100 or lower
- Press "Ultra" to add the ‘sheet lightning’ detection.
The "normal" mode detects only lightning bolt lines.
,Ultra-mode' reacts even to the slightest fluctuation in brightness. This mode is therefore more susceptible to movement. Therefore, you should use it only if you have a very steady hand or your iPhone is in a fixed (eg tripod) position.
The 'Ultra mode' is independent of the mask.
Please choose 'Ultra' only if you want to photograph ‘sheet lightning’.
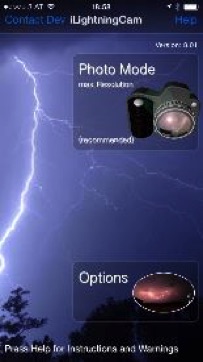
Main window:
'Contact dev. "Button:
Press the "Contact dev. ' Button to provide feedback to the developer via email.
Do not hesitate to ask, or to post your experience.
If you like, send us your lightning photos. We appreciate each lightning photo, and we will learn from these images about the behavior of our app to do further improvements.
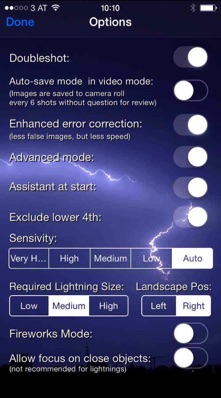
Options menu:
These settings above are optimized for iPhone 4s and 5, all iPads, and iPod touch.
For the iPhone 4, please deactivate ‘enhanced error corection’ to get more speed.
If the app works, please do not change these settings.
Double Shot mode: When activated, the app automatically saves two shots when a lightning is detected. The images have a time interval of 0.03 seconds.
Enhanced error correction: Mask works with double precision. When activated, it reduces the speed of the iPhone 4 significantly. All other devices will benefit.
Autosave mode in Video mode ': (Obsolete since iOS 8)
Enables automatic the saving function. After 6 recorded images in video mode, all 6 pictures are stored. No user input is required. The app runs and saves lightning images, until the battery is empty.
Exclude the bottom quarter of the screen of the recognition (exclude lower 4th from detection):
Cars and flashing lights are a potential source of trouble in the city and might lead to incorrect triggering of the camera. This feature excludes the lower quarter of the screen of the lightning detection.
Sensitivity (Sensitivity):
The 'Auto' setting is recommended.
Alternative: 'medium'. However, check the Mask bar on the right side of the app.
If not green for the most part, please change the setting to a lower sensitivity.
"Very high" if obvious lightning strikes are not recognized. Caution: Check the Mask bar.
'Low', when it is very bright or when the app continuously triggers without lightning.
This setting has no effect on the 'Ultra Mode "!
Required lightning size:
'Medium' is recommended.
'Low' when obvious lightning strikes are not recognized.
'High' if the app without triggering lightning strikes continuously.
The application should capture most lightning, provided a certain size and brightness of the lightning. Unfortunately, we cannot guarantee that each lightning will be captured, but with the right settings you get almost all of them.
Try it at home with a lighter - before the next storm!
Use Photo mode, a dark room, night mode, and select the large bright lightning bolt (right button).
To focus on close objects like a lighter, you must activate focus on close objects in the options card.
OR
Try it at home - with YouTube videos:
For example: the excellent video http://www.youtube.com/watch?v=sNzpBEe8Lqo of Heuler87
For good results (with 'YouTube videos):
• Use only HD videos
• Use daylight – videos.
• Use a good monitor
• When you take a video from another video, small artifacts appear on the second video - called Moiré artifacts. These can trigger the exposure continuously, usually it helps to be at least 40 cm away from the monitor. These artifacts also appear when using of plasma TVs.
• Never use the 'Night Mode' with monitors. Use the ‘auto’ sensitivity.
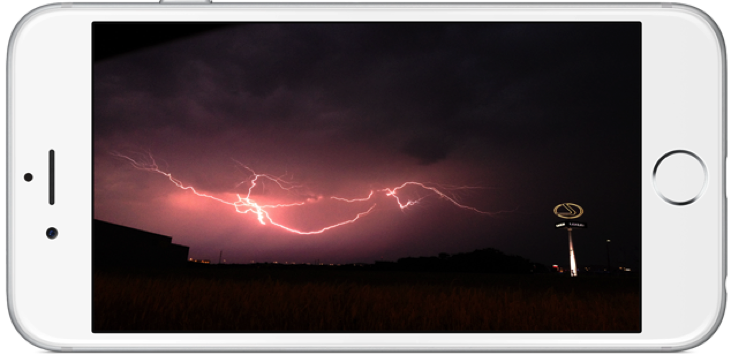
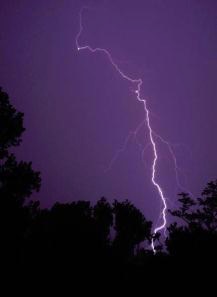
Take spectacular pictures of lighting strikes with your iPhone!
All lightning images on the entire webpage are taken with iLightingcam with iPhones or iPads. © copyright by Helmut Ringl and Florian Stiassny

Thank you for buying iLightningCam!
Version 8.04
By Florian Stiassny and Helmut Ringl
The program allows you to take pictures of a real (!) lightning
with iPhones, iPads and iPod Touch
Deutsche Anleitung Link
Mode d'emploi (Fr) Link
English Instructions - Short:
Please update your iOS! iOS 8.1 is needed for comfortable ISO control and best image quality!
The assistant:
• The assistant guides you to the proper settings
• Please always use the assistant
• All steps of the assistant are necessary in the presented order for perfect settings.
• For manual control (expert mode), press and the assistant is turned off.
Quick Guide:
• The "Photo" mode is the best mode for iPhones, iPad 3, iPhone 4 and iPad Mini!
Resolution = Resolution Photo
• The "Video Still" mode saves individual video frames as pictures, it does not store a movie.
Resolution = maximum video resolution
Best mode for Ipad2 and iPod Touch. Video Still mode is obsolete since iOS 8 and not offered anymore.*
• Select Photo mode.
• Point your device to the storm.
• Follow the assistant’s instructions
• Only for Video Mode: Before you leave the program, press "Show pictures" in the upper right corner. Then select the relevant images and save them (button in right upper corner).
* We stopped the development of video mode because after shooting more than 1500 lightning strikes over the last three years with different devices, we found that photo mode is the better option for all circumstances. Most devices therefore will not offer Video still capability anymore.
For most devices this means much more resolution and the time between two shots is the same since the arrival of the 4s
And it allows us more updates, because we have to improve only one mode
Four Important Steps:
Firstly:
You need a real storm!
Protect yourself against the storm and the lightning!
Lightning is extremely dangerous!
Do not take any risks when using this App; you are solely responsible for injury or death. Read the full warnings at the end of the document.
Secondly:
Set up your iPhone as steady as possible and point it to the storm.
The app detects lightning that appear as bright lines.
The app ignores simple flashes of light (= sheet lightning).
Use "Exclude lower 4th from detection" when flashing lights and cars are visible in the image.
Make sure that the app is not focused on raindrops on the window.
The app disables the recognition process if you move your device too fast.
This status is displayed on the bottom left of the screen: Detection 'On' or 'Off'.
Thirdly:
Make sure that 'Auto' is selected for sensitivity (the menu bar at the top center).
The number of recorded images is displayed in the upper left corner of the screen.
Fourth:
Photo Mode: each image is automatically stored in the images directory of your device.
HD Video Still Mode (obsolete and not available anymore since version 8): Before you leave the mode, press the "Show pictures" button (top right of the title bar). Then select the images you want to save by touch. Then save these images with the 'Save Images" button (upper right corner of the screen) to the image directory of your device.
The App always selects the best exposure for lightning. During daylight, the foreground is therefore always very dark.


iLightningcam 8.04
for iPhone, iPad, and iPod touch